Before starting the article, it is worth noting that the following techniques and tips are designed for users who have fundamental knowledge of using the program and its functionality. So, we will describe several ways to change the color of clothes in Photoshop.
The first way is colored clothes
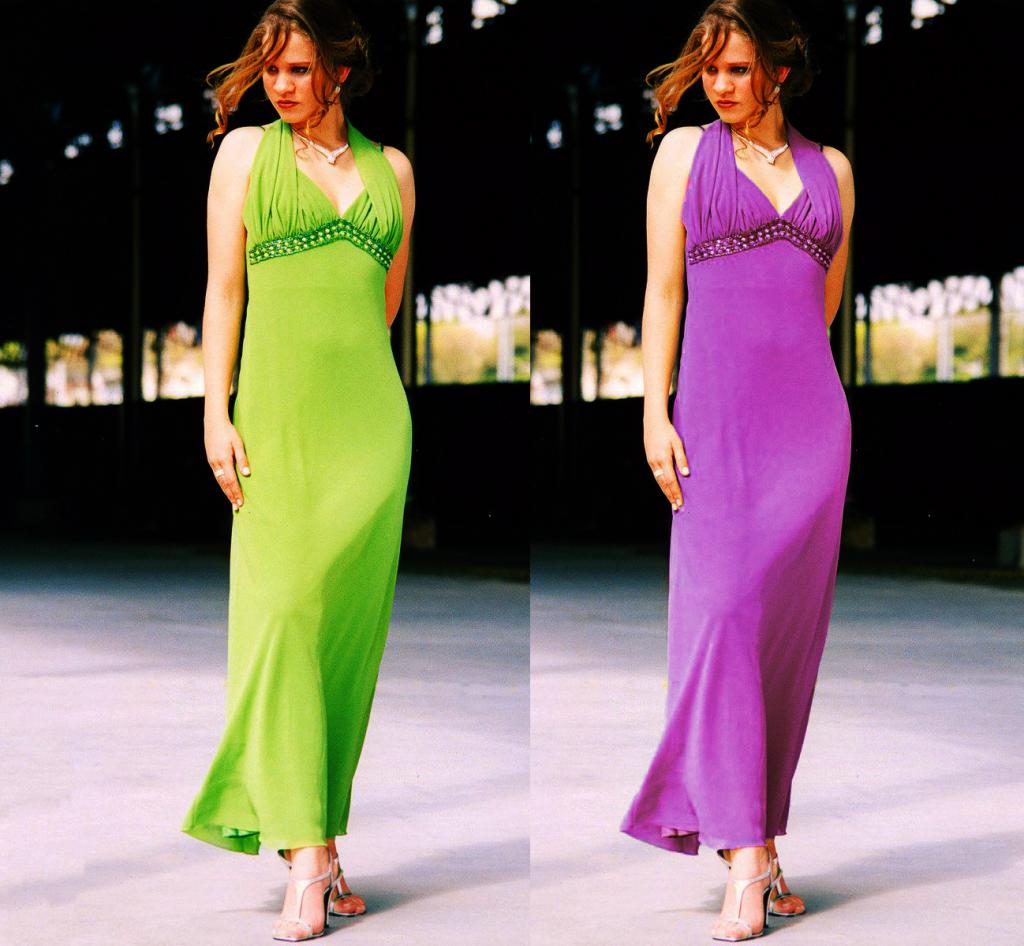
Colored clothes for the first method we will consider clothes of red, yellow, green, blue, blue and purple colors. This method can be used in any situation. However, the easiest way it will appear when there are no objects in the background of the photo that have the same color as the clothes you wish to change.
Upload the photo to Photoshop and click on the "Create a new adjustment layer or fill layer" button on the layers panel, in the list that appears, find the "Color Tone / Saturation" item. Select the color range of the desired item of clothing (the menu for selecting the range is indicated by the arrow in the screenshot below).
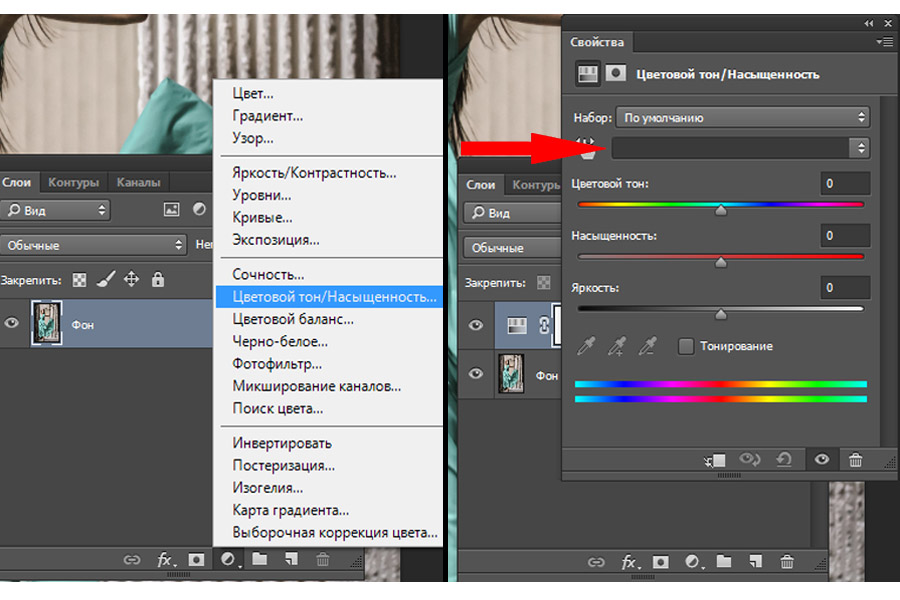
Next, click on the pipette icon and just left-click on the item of clothing. Now it remains to configure three parameters: “Hue”, “Saturation” and “Brightness”. Start moving the first slider and you will see how the color of the clothes gradually changes. Continue tuning until you get the color you want. Adjust “Saturation” and “Brightness” to get a sharper tone, but do not overdo it so as not to spoil the work with artifacts. In some cases, these manipulations are enough, but no one is immune from random errors, for example, from the shadow on clothes. The program may incorrectly recognize the color, and this, of course, will not affect the final result in the most pleasant way. To correct inaccuracies, select the Add Shades tool (eyedropper icon with a plus sign) in the Color Tone / Saturation panel and click on the problem areas until all the flaws are fixed. So, here is the result of the work.
The opposite problem occurs when the program recognizes excess elements and their color changes with the clothes, for example, the wall and skin change color with the girl’s dress in the photo below. How to change the color of clothes in Photoshop without hitting other items?
Select the Eraser tool and, on the adjustment layer, begin to correct this error: erase all the elements that changed color along with the clothes. You can also use the Brush tool: a white brush helps to add the missing color to the area, and black - to remove.
Replacing white with black
Create a copy of the original photo and select the garment on it in the quick mask mode or the Quick Selection tool (for more accuracy, click the Refine Edge button in the panel at the top and adjust until you get an acceptable result). After that, on the panel with layers, click the "Add layer mask" button.
Double-click on the layer with the desired element, go to the "Color Overlay" section, select the "Linear Light" mode (do not be afraid to experiment, and maybe you will choose a more suitable mode for your photo), click on the panel to select a color next to it and set black. Next, adjust the Opacity parameter until you get the right tone. Add adjustment layers based on the situation.
Replacing black with white
Repainting black clothes in white will be a little more difficult. The initial steps are the same as in the situation above: cut the object and go to the Color Overlay tab. Select the Soft Light mode and white color (these actions are optional, but sometimes they can facilitate the work). Now create three adjustment layers "Selective color change". Double-click on the bottom of them, select a white color in the "Colors" section and set all the sliders to -100%. Then select a neutral color and do the same. Go to the second layer created and in the white section set -100% for black, on the third layer - about -50%. Adjust the black color in the neutral section. On the second layer - about -50%, on the third - about -30%, but most likely, the numbers will have to be selected independently.
This can be completed, but if you think that the image looks unrealistic, try the following. Using the "Layers" section at the top, create a new layer with the "Overlay" mode. Be sure to check the box next to "Fill with the neutral color of the Overlap mode (gray 50%)." Select the Dimmer tool and on the created layer with a gray color, begin to select the seams and creases on the clothes. Note the exposure option for the dimmer. The more the value in the window next to it is set, the more noticeable and sharper the lines drawn by you will be.
How to change the color of black or white clothes in Photoshop?
This paragraph will describe how to change the color of clothes in Photoshop CS6 for situations where you want to make black or white clothes color.
Upload a photo, create a copy, and select the desired item in the quick mask mode or the Quick Selection tool, click on the "Add layer mask" icon. If you turn off the bottom layer with the original photo intact, you will see that only the subject you selected remains on the copy. Then create a new adjustment layer "Color Balance" and adjust the sliders so that the clothes take on the color you want. If the whole photo changes color together with the clothes, do the following: on the layers panel, place the adjustment layer above the layer with the garment, right-click on the adjustment layer and select "Create Clipping Mask".
All irregularities around the edges can be fixed with a brush or eraser. Modify to the desired state with adjustment layers and filters, the photo is ready.
If this method does not suit you, then use the method from the previous paragraph, slightly changing it. Select and cut the garment, double-click on the layer, in the "Color Overlay" section, find the appropriate mode and select the desired color. Correct to the desired state.
Change the color of clothes in Photoshop using a texture
Above, we considered some methods that work due to the functionality of the color adjustment program. But there is another method that differs from the previous ones. In this section, you will learn how to change the color of clothes in Photoshop CS6, using a texture instead of adjusting the sliders. The advantage of the method is that the texture can be applied to both colored and black or white clothes.
Create a copy of the original photo and select an item of clothing on it in the quick mask mode or the Quick Selection tool. After that, on the panel with layers, click the "Add layer mask" button.
Now drag the texture previously downloaded on the Internet onto the photo and place it so that it completely covers the garment. Place the texture layer above the clothes cut layer, right-click on the texture layer and select "Create Clipping Mask". If you did everything according to the instructions, you should see a situation similar to the one in the photo below.
The texture took the form of a garment, now it remains to achieve realism. Try changing the blending mode of the texture in the layer panel. In this case, the choice fell on the "Bright Light" mode, but it is worth looking at all the options before continuing. Experiment with adjustment layers and the Opacity option to give your photos even more realism and beauty.
If the texture still looks flat, then follow these steps. Through the "Layers" section, create a new layer with the "Overlap" mode, check the box "Fill with the neutral color of the" Overlap "mode (gray 50%).
Using the Dimmer tool on the created gray layer, select seams and folds of clothing. After you finish drawing, finalize the photo, carefully look at it for errors, make sure that the clothes do not seem superfluous in the photo.
Conclusion
We presented several effective ways of changing the color of clothes in Photoshop, but it is worth noting that, using these methods, you can change the colors of any objects: cars, interior, skin, hair, and so on. Do not limit yourself to creativity. Try to make your changes to the instructions, achieve the desired result by any means. Good luck