Quite often, many users of modern computers are faced with the concept of a system image. However, some of them do not have a clear idea of what it is and what it is for. Let’s try to consider what a Windows 10 system image is and clarify some important issues regarding its creation or further use. But it’s worth starting with a description of some typical misconceptions that are common among ordinary users.
Windows 10 System Image Concept: Common Misconceptions of Ordinary Users
So, the main problem of novice users is that almost all of them imagine the image of the system exclusively in the form of a file, most often having the ISO extension, completely forgetting about some other important aspects related, for example, to the contents of the file itself, which in some I mean, you can call it a kind of container by the type of the same packed archives.
Yes, indeed, on the one hand, the image of the Windows 10 system is the very file designed to save it on the hard disk and then write it to removable media, which can be used to install the operating system on any computer device. But many forget that in a sense, the image of an already installed workable system, created by its own means or using third-party programs, can be described as a snapshot or snapshot of a state at a certain point in time. From such a backup copy, you can restore the functionality of the OS, if it was damaged, quickly enough, without even having to reinstall it completely. Moreover, if a full backup is initially created that contains information about user files and installed programs, after restoration all this will remain intact. Thus, further we will consider actions with images, proceeding precisely from such considerations.
Creating a Windows 10 System Image for Installation
So, let's start with the simplest one and look at creating an installation distribution kit that can be used for the initial installation of the system on a computer or to launch the system recovery environment in case of damage. The easiest method to quickly create an image of a Windows 10 system for installation on a PC or laptop is to use a special utility developed by Microsoft, which can be downloaded directly from the official website of the corporation. This is an MCT program. The convenience of its use is that the user does not have to deal with the image as such. It is enough to run the application on the computer and choose to create a boot distribution.
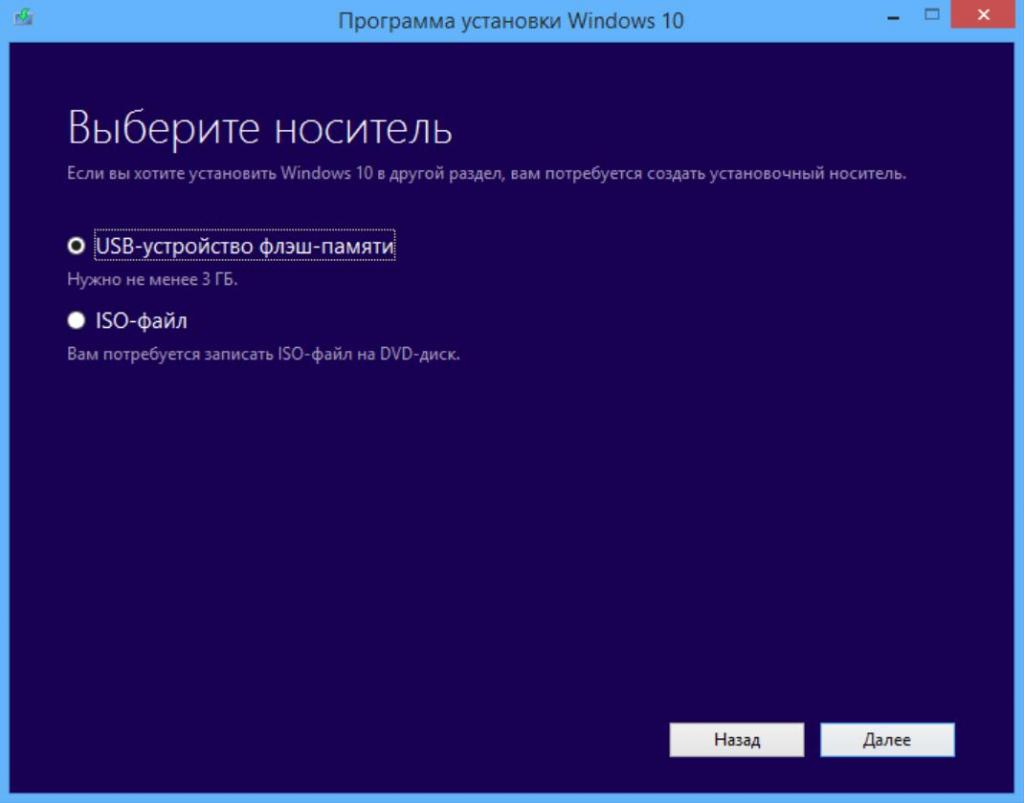
There are two options to choose from: either immediately create bootable media, or save the ISO file to your hard drive. If you need a bootable flash drive, you can immediately select this item. In the process of preparation, the installer files will be downloaded from the Internet and written to the selected medium. In the second case, as already clear, the ISO file will be saved on the hard drive, from which you can later deploy the Windows 10 system image to a USB flash drive or optical drive.
Additional Image Deployment Information
Based on the fact that the user first saves the file for subsequent deployment, it should be clearly understood that to create bootable media, it is not enough just to copy it to the selected removable media, since this will not give anything. The fact is that when you deploy a Windows 10 system image by transferring its contents to a removable device, files are extracted from the main container as it is when unzipping (it is not surprising that image files of any format can easily be opened using the archiver available in the system like WinRAR, WinZIP, 7-Zip, etc.). To simplify the recording, you can use standard Windows tools, but using a specialized program like Rufus, WinSetupFromUSB, WinNTSetup, UltraISO, etc., can be called a simpler technique.
True, if the first three applications and the like create bootable media automatically, then in the programs for working with images, you will have to manually select the creation of a device with self-loading.
What is the role of recovery points?
But all this concerned exclusively those situations when the user needs to create the installation disk. Now let's see how to make an image of a Windows 10 system, bearing in mind the creation of a backup for quick recovery of the OS in case of a malfunction. Here you can also highlight several basic methods, but the simplest is the quick creation of a recovery point, which will be saved in a special section reserved by the system on the hard disk.
To perform such operations, you need to use the properties of the computer, go to the system protection section, and then on the appropriate tab, which will be opened by default, select the desired section, click the create recovery point button, enter an arbitrary name and confirm the start of the process.
The created recovery point can be used for quick rollback, for example, when the computer was not completed correctly, and the recovery will start automatically or by manually selecting a picture from the recovery section, if necessary.
Creating an image with built-in system tools
It also sometimes makes sense to create a backup copy of the system with all the programs installed in it. It goes without saying that such a picture will take up much more space than in the previous case, but you can be firmly convinced that when restoring from such a copy all the applications present will remain fully operational, not to mention the safety of all user files and settings. In this case, you can create a Windows 10 system recovery image through the standard “Control Panel” by going to the recovery section and clicking on the file history hyperlink.
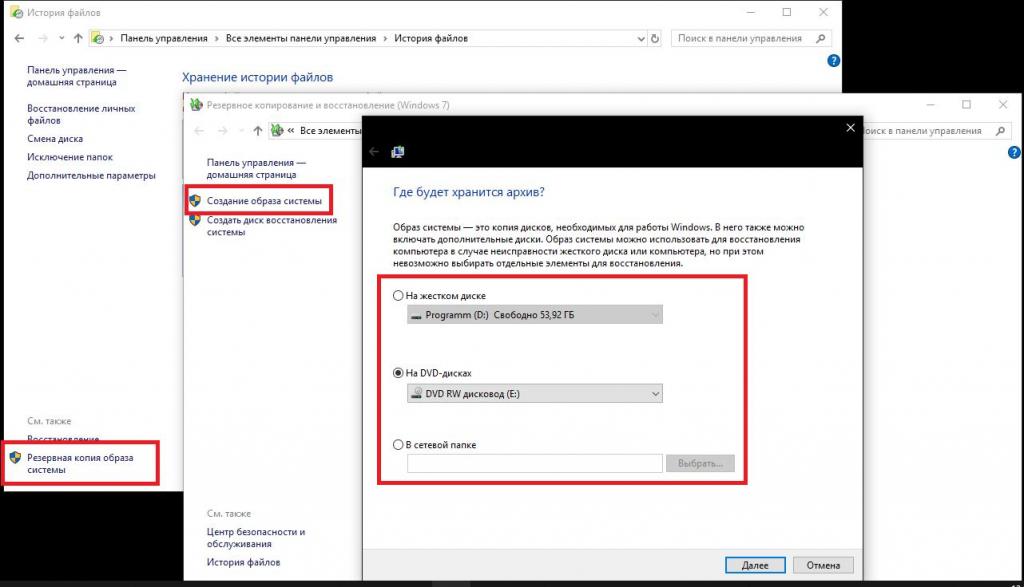
After a window is displayed with a message stating that the disk was not found (this is normal), you must click on the backup link and then directly activate the image creation. Next, the system will analyze all the disks, offering to save the image a virtual partition, optical media or network folder. The disadvantage is that there may not be enough space in the virtual partition, since it may require even more than is currently occupied in the system partition. With DVD-ROMs, and so, I think, everything is clear (imagine how many blanks will be required to copy the entire contents of the system partition?). And when you save the image in the network directory on another terminal, if it is turned off, access to such a copy will not work if necessary. The way out, as the system itself recommends, will be to connect an external hard drive with a sufficient amount of free disk space. Along the way, you can create a recovery disk, which will contain exclusively operating system files designed to run the toolkit to quickly fix all kinds of problems.
Using DISM Tools
By and large, only the simplest and most primitive backup methods have been described above, but professionals often prefer to use more advanced methods. One of these is the use of the command line with DISM tools. In the console, which should start exclusively with administrator rights, you must first call the DISKPART tool, after entering the list volume command, determine the letter of the selected section, remember it and exit.
After that, the line shown in the image above is written in the same window (in the example, the virtual disk “D” is indicated for saving). Unlike the standard image, when the copy is created, the file will be saved in the WIM format, which can then be used to restore the functionality of the system itself and all applications installed in it.
Third-party imaging software
Similar procedures can be performed using many third-party applications. In particular, some software products from Acronis and AOMEI can be called good tools. The principles of their operation do not differ much from standard Windows tools, however, their use looks simpler, and the possibilities in such utilities are somewhat larger.
For example, AOMEI's Partition Assistant utility allows you to copy individual disks or partitions and turn them into bootable ones. By the way, the Windows To Go function, which allows you to quickly transfer a working OS to removable drives, works here much more efficiently than the tool of the same name in Windows 10 itself.
System Restore
As for restoring the OS from the created copy, in the working system you can use the corresponding section in the "Control Panel", but this applies only to rollback points. To gain access to the choice of a backup copy of the entire system as a whole, it is better to turn to special boot options using the restore item in the options menu. You can also simply reboot with the Shift key held down or start from removable media with the distribution kit, choosing recovery, diagnostics and troubleshooting, respectively.
In the last menu, the copy selection item will also be presented, which will usually be detected automatically when a removable media is connected. If you encounter a problem, you can specify the location of the WIM file manually.
The nuances of using copies on some laptops
On many models of modern laptops, manufacturers already “sew” additional utilities for quick recovery into the software environment, usually called Recovery.
Most often, with their help, users for some reason only reset to factory settings, although you can also create a copy of a working OS in them. This approach allows you to restore Windows 10 from a system image even at the boot stage of the laptop only with a call to the built-in tools without starting the installed OS.
Note: such actions in relation to any version of the system can be performed only if it is preinstalled, and no actions were taken to replace it with another modification or to format the hard disk.