Adobe Photoshop is one of the most popular programs for editing images, creating objects and retouching photos. The ability to use the functions of this graphical environment allows you to correctly apply the necessary editing tools to any situation. You can either remove unnecessary items in Photoshop, or edit the entire image. This is useful even to those people who are far from the fields of design, advertising and the like. Probably, many have encountered such a problem as unnecessary details in the photo. How to remove excess items? In Photoshop, there are several different tools that will cope with this misfortune.
We remove excess objects with the help of "Photoshop"
How to remove excess objects in Photoshop? Extra objects can be of various geometric shapes, as well as have any location relative to all other objects. Given all these factors, the user needs to decide which tool to choose in a particular case. There are completely primitive tools that are cropping around the edges, and there are more complex tools that provide the removal of complex graphic objects.
Frame tool
Excess items in Photoshop are removed both directly (cropping), and using auxiliary elements. The easiest tool to use, which helps to remove objects by moving the graphic frames of the image, is the "Frame". Most often used if an unwanted object is near the edge. It should be understood that along with unnecessary items, those that were also on the sides of the document will be removed. If the user still decides to use the "Frame", then you need to know that it can be of various shapes. Some types of tools differ in interaction functions.
- First of all, the user must run the application and open the source image.
- On the quick access panel there is a cell in which the framing tools are combined. Select the standard tool "Frame".
- In the working environment, a grid appears consisting of two vertical and horizontal stripes that intersect each other. This is done so that the user appreciates the orientation of objects in the image (some may appreciate the effect of the "golden section"). The grid can be moved in different directions, narrowed and expanded. In our case, it is necessary to narrow the frames to the desired size so that the excess object is removed outside the grid.
Pen tool
An extremely useful item that is used by all those users who are fluent in the program. Before you remove the excess items in Photoshop, you need to familiarize yourself with the tool. The Pen creates a work path that can be reformatted to fit the selected area, and then work with it. A contour can be created for an object of any complexity - this is the main advantage of this tool.
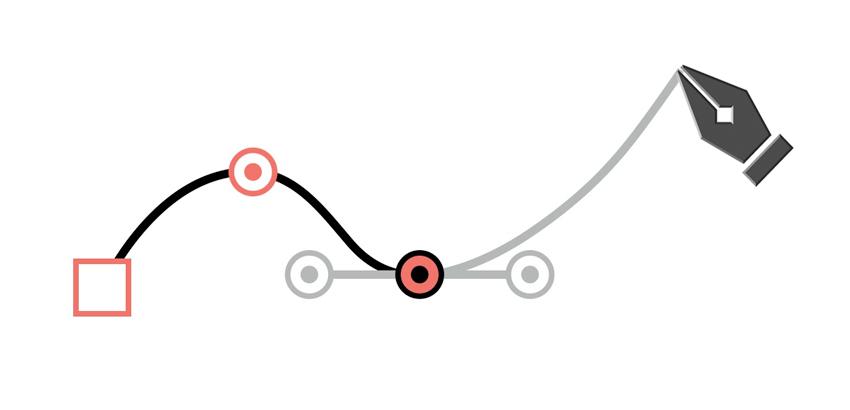
- Before you remove the extra item in Photoshop, you need to open the application and the document with the image.
- The Pen tool is located on the main panel, where all the other tools are.
- To start creating a contour, you must first put the first reference point on the border of the "object-image" section, through which you will then need to close the working contour.
- The following reference points must be set along the contour of the object, which will subsequently be deleted. If part of the contour needs to be made in the form of a curve, then additional reference points come to the rescue, which create the radius of curvature of the line. You can adjust them using the left mouse button.
- The circuit must be brought to the very first point to create a closed perimeter.
- Right-click on the context menu where the user needs to select the "Create selected area" item.
- The newly created area must be deleted using the Delete key.
Selection Tools
In addition to the listed tools, there are those that select the area using the cursor, some of them work on the principle of highlighting adjacent areas and colors. Before you remove extra items in Photoshop through preliminary selection, you need to determine the specific case.
- Rectangular and oval area. In our case, the tool is no different from the "Frame".
- Quick highlight and magic wand. It is based on the method of selecting those areas that are close in color to the main area. It is used for text processing, small details.